There’s nothing that quite matches the majesty of the night sky—or the difficulty involved in capturing that scene on camera. Photographing anything in dark scenarios is tricky, add just distant pinpoints of light and getting a great shot of the stars can be downright challenging. Capturing a great night sky isn’t a matter of having the latest, greatest equipment—it’s about having a bit of know how. Ready to take dramatic shots of the night sky? Here’s the beginner’s guide on how to photograph the stars.
What You Need
While there are a few cameras designed just for astrophotography, you can photograph the stars with a basic DSLR or mirrorless camera. Along with the camera body, you’ll need:
- A wide angle lens with manual focus (a kit lens can often work, though a fast lens with a low f-number is best).
- A tripod
- A remote release (optional)
- A flashlight (for setting up in the dark)
- Patience
 How to Photograph the Stars: The Steps
1. Wait for the right weather.
Of course, you can’t photograph the stars if you can’t see them, so you’ll have to pick the right night to head out, a clear night is best. A little bit of wispy clouds can work, but the skies will need to be mostly clear. Pay attention to the moon as well—light from a full moon will overpower light from the stars, getting you fewer stars in the image.
2. Choose a location.
When it comes to shooting the stars, choosing a location comes down to more than just finding a nice scene. You’ll need to avoid light pollution—that means staying away from cities and heading out to a rural location. Stick away from street lights, buildings and other artificial light sources. Bring a flashlight along so you can get set up easily, and a friend for safety, especially in unfamiliar areas.
3. Set up your tripod.
A tripod is a must for night sky photography. With little light available, you’ll need a longer shutter speed, so a tripod is necessary for a sharp shot. Take a look at your scene; keep an eye out for foreground objects and scenery to include in the shot and offer some perspective. Once you’ve chosen your angle, set your camera up on the tripod.
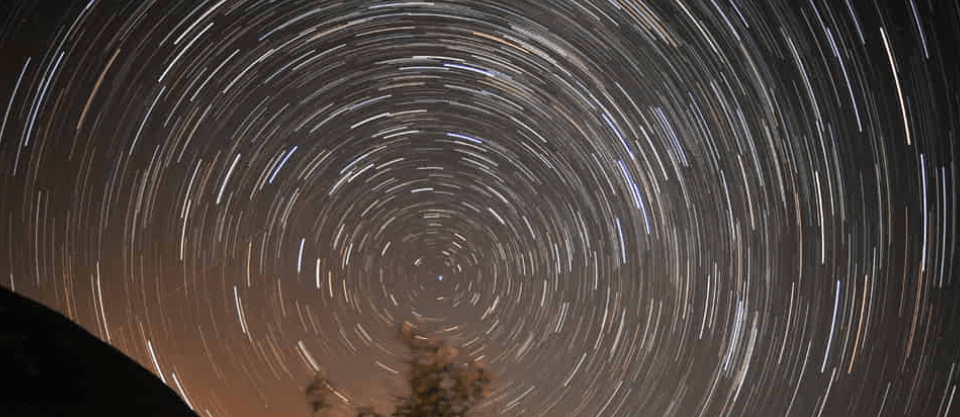
If you are aiming to shoot star trails making a circular pattern across the sky (more on that next), you’ll need to include either the north or south pole in the image for that circular pattern. If you are shooting in the northern hemisphere, you can find the north pole by looking for the Big Dipper and finding the North Star, on the end of the handle. The south pole is a bit more difficult to locate, but you can use a program like Stellarium (http://www.stellarium.org/).
4. Set your exposure settings.
There’s no one right way to shoot the stars. The first thing you’ll need to decide on is if you want to capture the stars as pinpricks of light, or as star trails. The rotation of the earth will give stars a motion blur effect—if you’d like to keep the stars sharp, you’ll need a shorter shutter speed. Around 30 seconds will let in more light, while still being short enough to prevent the rotation of the earth from creating star trails. With that “shorter” shutter speed, you’ll need to use a wide aperture and a high ISO.
Star trails can make great photos, though. If you’d like to shoot star trails, you can use a much longer shutter speed, or bulb mode for extreme long exposures. For star trails, your exposure should be at least 30 minutes, but could even be a few hours. An exposure time of 45 minutes, for example, is enough to make the star trails into a circular shape. Of course, with such a long exposure, you don’t have to use such a high ISO, and a lower ISO will allow for less noise.
When shooting star trails, a light meter or light meter app can come in handy for calculating your exposure settings—you don’t want to have to shoot a two hour exposure more than once. Or, you could also take a shorter test photo (around 30 seconds), then adjust your ISO and shutter speed equally. Cutting your ISO in half and doubling your shutter speed simultaneously will get you the same exposure with a longer shutter speed. That means if your test shot has a good exposure at 30 seconds with a 6400 ISO, the exposure will be equal at 60 seconds ISO 3200, 120 seconds ISO 1600, 240 seconds ISO 800, etc.
 5. Set Your Focus.
Autofocus doesn’t work for photographing night skies so switch to manual focus instead. Start by twisting the lens to the infinity mark, then adjust from there. This may take some practice, and it’s one of the ways becoming familiar with your own gear will help you become a better photographer. If you find a “sweet spot” for stars, write it down or put a sticker on your lens there, so you can easily remember it next time you shoot.
6. Shoot.
You picked the right night, a good scene, set the exposure and the focus and now it’s time to take the shot. To avoid introducing camera shake when you press the shutter release, use a remote control. Cameras with built-in wi-fi can be triggered remotely with an app, or many manufacturers make remote releases that are relatively inexpensive. If you don’t have a release, you could also set your camera to the self-timer, so your hand isn’t on the camera when the exposure starts.
7. Review and adjust.
Photographing the stars takes some practice, and some patience. Take a look at your photos—what can you improve? How many stars can you see? If you can’t see many stars, your exposure may not be quite long enough, or there may be light pollution from street lights or the moon. If your photo is too noisy from a high ISO, you could try a longer exposure. Or, if you don’t want the stars to turn into star trails, you can take two photos—one that freezes the stars, and a second at a lower ISO and longer shutter speed that captures the scenery without noise, then combine those two images in your favorite photo editor.
Capturing the magnificence of the night sky can be tricky, but when you get it right, you’re left with an amazing image. Choose a night with few clouds and little moonlight, and a location without light pollution. Use a tripod and put some time into figuring out the exposure settings for either star trails or crisp pinpoints of light. You will probably need a few tries to get it right—exercise a bit of patience and continue reworking the shot; you’ll be glad you did.
Looking to sharpen your photography skills? Join our top-rated professional online photography course today!


