When it comes to moon photography, people instantly think of large telephoto lenses. But if you have something low-end like a 55-200mm lens, it shouldn’t stop you from trying out moon photography. Yes, big lenses with big zoom capabilities and big apertures are handy for long-range shots, but they are also big on the price.
For taking pictures of the moon, you actually don’t need a big aperture lens because
- You don’t need shallow depth of field, as it is irrelevant for any illuminating object which is sitting in dark space.
- When the object itself is illuminating light and you want to get the texture of its surface, you should not use big apertures because they will just blow out light and give you a bright patch with no data in it.
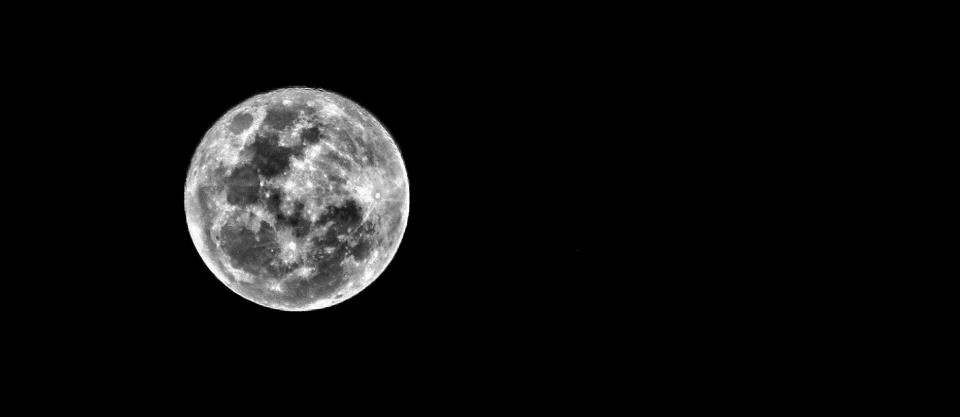
You can easily make do with something as humble as a 55-200mm f/4-5.6 telephoto lens. So without further ado, let’s learn how to take pictures of the moon, like this one:
Things you’ll need for taking pictures of the moon
Of course, you need a camera. But besides that, you’ll need
- **A full moon night
** Or just about any night where the moon is in its formation stages. A partial moon is also a good subject to photograph because the tilted angle of sunlight falling on it makes the craters and rocks on the surface of the moon cast a shadow giving you a nice detail on the moon’s surface. - **A tripod
** Know that the moon is not a stationary object. Every second, it keeps moving along its orbit. To that, add the shake from the camera’s shutter, plus you holding the camera in your hand; you will most probably end up having motion blur. It might look good to you when you review it on your camera but the moment you notice the blur on a bigger screen, you’ll wish you had used a tripod. - **A telephoto lens
** We’ll be dealing with the 55-200mm lens here, which is a basic telephoto lens and is also easy on your wallet. But don’t let the price fool you. It’s a good performing lens in broad day light. If you have a more advanced lens, all the better. - **A chair
** Well, actually the chair is for you. You will not be able to nail a good moon shot on the first attempt. You will need to take multiple shots to be on the safer side, mostly because the camera preview might deceive you while looking for blurs. The camera will also have to be positioned at an angle at which you will have to bend down to see the live preview or press those buttons on your camera. This constant bending down might not be good for your back. So have a chair and sit comfortably behind your tripod.
How to take pictures of the moon?
Once you have gathered all your gear, set it up in any open spot. I did this on the terrace of my house. Fix the 55-200mm lens on your camera, fix camera to the tripod and set it down at the angle facing the moon. Set up your camera to shoot in RAW format, not JPEG.
- Turn on the live view of your camera. This will just make the process a lot easier.
- Turn on the timer on your camera and set it to your desired duration. This is to avoid shutter release shake. If you have remote shutter release, then you need not do this.
- Extend your lens to maximum focal length. If you are using a 55-200mm lens you will see that though the lens has zoomed in to the maximum, the size of the moon is quite small to detect if the focus is set right. Therefore, we will zoom in on the live preview to enlarge it.
- Press the zoom in button on your camera to zoom into the preview. This is not zooming on the image itself, this is just zooming into the live preview so you can see the moon a little more closely.

- At the max focal length (200mm), the 55-200mm lens will default the max aperture to f/5.6. This is good enough. If you have a bigger telephoto lens with bigger aperture, you might want to reduce the aperture size a bit.
- I took multiple shots to get the exif mainly because what I was seeing in the live preview and what I could see in the image review had a huge difference. I started shooting at 1/100sec but at aperture f/5.6 this was just too bright. I did not decrease the aperture size further because I felt this was an opportunity to further increase my shutter speed. And since the moon is always moving constantly, faster shutter speeds are a boon.
- I kept on increasing my shutter speed further until I realised that 1/800 secs is pushing it too far. The moon just looked too dark. So I shot a bunch of pictures at f/5.6, 1/640secs and ISO100 (do not increase the ISO beyond 100) out of which I felt that this is best of the lot without any shakes or blur.

So, that’s it with the shooting. Pack up all your gear and head back home. It is now time to edit our image.
Learn Photography
Master the fundamentals of photography, from the basics to advanced techniques, and become a professional photographer.

Things you will need for editing pictures of the moon
- **Adobe Photoshop
** If you are wondering, “but I don’t know Photoshop” just relax. We will not do anything complicated, just some basic tweaking. I guarantee that if you have never used Photoshop before, you may want to learn Photoshop after you are through with this. - **Camera RAW plugin
** Or Lightroom works fine too. It’s nice to have Adobe camera RAW plugin as well because it comes in handy for minor editing tasks like this one. Moreover, it’s free. - **Google nik silver efex
** I normally recommend the complete suite to any one asking me about nik software. They have other plugins like like HDR efex, viveza, etc that come in the suite which can be used for various kinds of photography. For this tutorial, however, we will only need the silver efex.
Nik silver efex is a plugin, just like camera RAW, which need to attach itself to a relevant software. Therefore, install Photoshop first and then move on to installing camera RAW and Google nik silver efex plugins.
Editing pictures of the moon
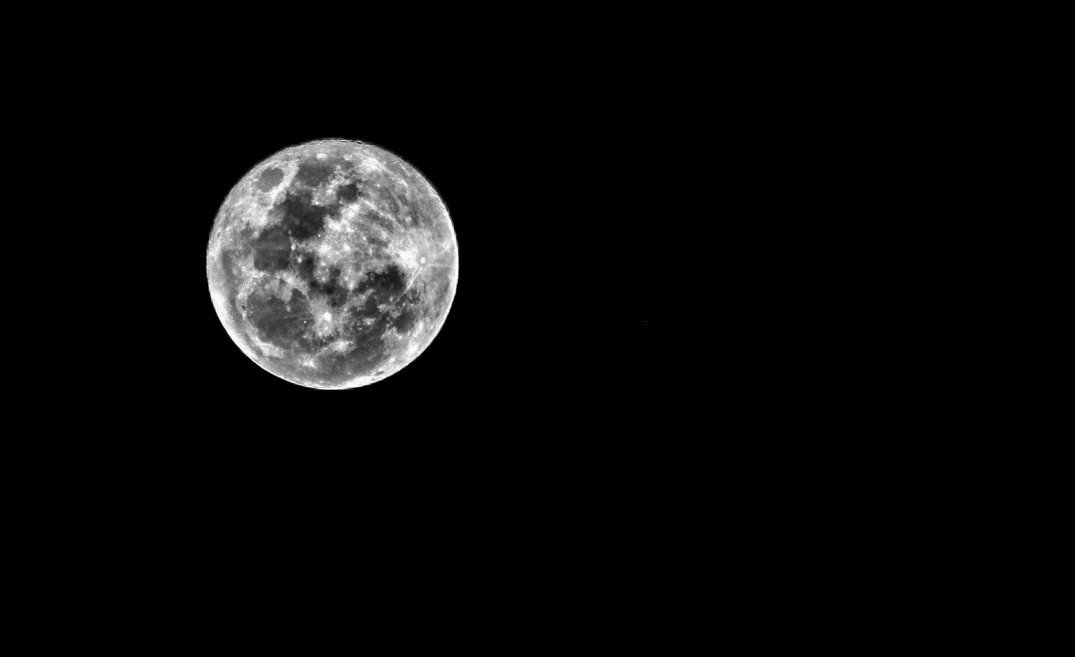
What we will do here is to enhance the details on the surface of the moon so that the rocks and craters are more easily visible.
- Open the RAW file in Photoshop. Just click and drag it to Photoshop workspace and it will open the file in camera RAW plugin.

- Click on the crop tool and crop the image to get the focus on the moon (don’t crop too close). Follow the rule of thirds while cropping. This means, crop in such a way that the moon is not in the centre of the frame. Place it anywhere away from the centre. Towards left of the centre, or right, or bottom left, just about anywhere else but the centre.

- See the clarity slider here? All you are going to do is move that slider to the maximum (towards right).

-
Once you are done with step 2 and 3 click on open image button at the bottom right to open the image in the Photoshop workspace.

-
Now from the top menu, go to filter -> Nik Collection –> silver efex pro.

The image will open in a new window.
-
On the right hand side, locate the soft contrast and structure sliders. Move both the sliders to the maximum (towards right).
 Once done, hit ok button at the bottom right.
-
You will see that you are back inside Photoshop and the changes made in nik silver efex are now reflecting in your image.

That’s pretty much it. You can save you PSD file or jpeg right here but wait. Zoom in to your image and see if there is anything that you are over-looking. (I do this in every picture that I edit). You’ll see that there is a little bit of noise in the form of chromatic fringing.

What happens is, sunlight falling on the moon reflects and diffracts from its surface. By increasing the structure and the clarity slider, we sharpened up the image to get the texture on the moon. However, since it was a global adjustment we ended up enhancing the light diffraction as well making the chromatic fringing ever more evident. Now, this is what you will do to fix it.
-
Take a look at the layer’s panel on the right side of the work space. You will see that the layer’s panel shows two layers. One image which is marked as background and another layer on top of it marked as silver efex pro 2. Make sure that silver efex pro layer is selected. On this layer we will create a new blank layer.

-
On your keyboard press ctrl + shift + n (command + shift +n in mac).

This will open a new dialogue box. Just hit enter and you will create a blank layer.
-
Select the brush tool (key board shortcut – b). From the brush menu in the top left corner, select the hard round brush.

- Set the foreground colour to black (key board shortcut – d)
-
Now zoom in on the moon by holding the ctrl key (command in mac) and pressing the + button on the num pad.

-
Carefully paint over the fringing to make it disappear. You might want to go spot by spot, by carefully clicking each spot instead of dragging all over.

See how in the upper part of the image you can still see the fringing and at the bottom where we have painted, there is no more visible fringing. Just make sure that you are painting on the blank layer so that you can easily erase any mistake with the eraser tool without affecting the actual picture of the moon. - Once you are done, save your file.
And it’s done
Now you have your very own photograph of the moon with the surface details. Save your work as JPEG and go ahead and show it to your friends. If you found this tutorial useful, share it with your friends so that they can learn the tricks as well.
– images by Irfan Hussain
Looking to sharpen your photography skills? Join our top-rated Photography Certification Course today!


