Like any other art form, photography uses deception to captivate its audience. A photographer uses technical knowledge to control and capture ambient light from the angles they see fit.
Software algorithms have developed to such an extent that even with basic knowledge of photo editing software, photographers these days are able to create surreal effects in their images.
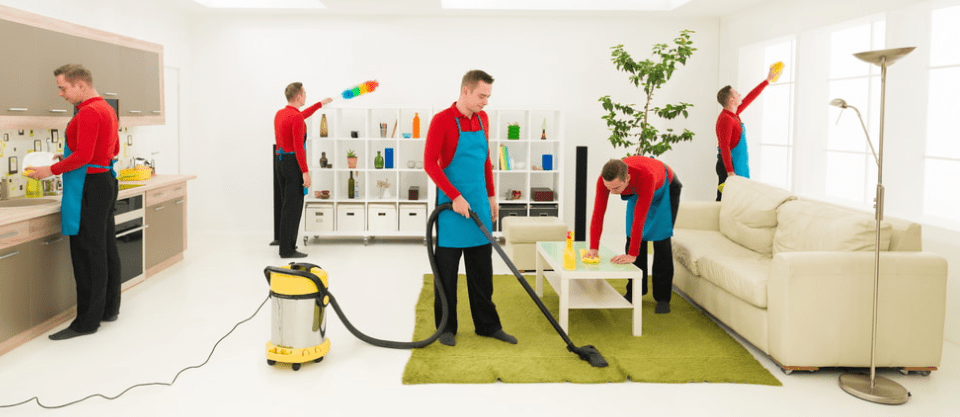
One such simple effect is called cloning. This is a lovely effect and it usually gets amazing reactions from people who see it.
How does it work?
Cloning photography is the process of capturing duplicates or doppelgangers of a subject in one single frame. Best part about cloning photography is that it can be used in many creative ways to create even a complex scene with many characters involved in it, where all the characters are just one subject.
Preparation
You will require to setup a few things to make your cloning shot.
- Camera: To get started, just about any camera will do. Even a simple point and shoot will work just fine.
- Tripod: It’s a must, no compromise here. If not a tripod, make sure you have some hard stable surface on which you can position your camera.
- Photoshop: This or any other software where you can work with layer masking.
Shooting
All set? Great. Let’s get clicking.
- Visualize your scene: A lot of amateur photographers create successful cloning shots but they fail to create a scene. Rather than shooting your subject standing or sitting next to their doppelgangers, cloning photography will create a better impact on your audience if a candid scene is created with your subject. For example, a group of friends having a conversation. Also, try to get your subject to pose in such a way that the positions overlap.
- Set up your tripod: Once you have your scene ready, compose your frame and fix the camera on your tripod. Take a few sample shots of the scene to dial in the right settings for desired exposure on your camera.
- Click images: Ask your subject to take their first position and then take their picture. Now, ask them to move to their next position. Then without disturbing the position of the camera or the tripod, snap your second picture. Again, wait for the subject to move to the next position and then click another picture. Repeat this process until you have all the pictures that you need to complete your scene.
Preprocessing
We will start with importing our images in Photoshop. It’s ok if you have shot them in JPEG but if you have shot them in RAW, import them all at once to simultaneously make RAW adjustments to images in Photoshop.
At this point it’s best if you only make basic adjustments. Once you are done with the cloning part, you can move on to other editing steps like split toning or black and white in the final image.
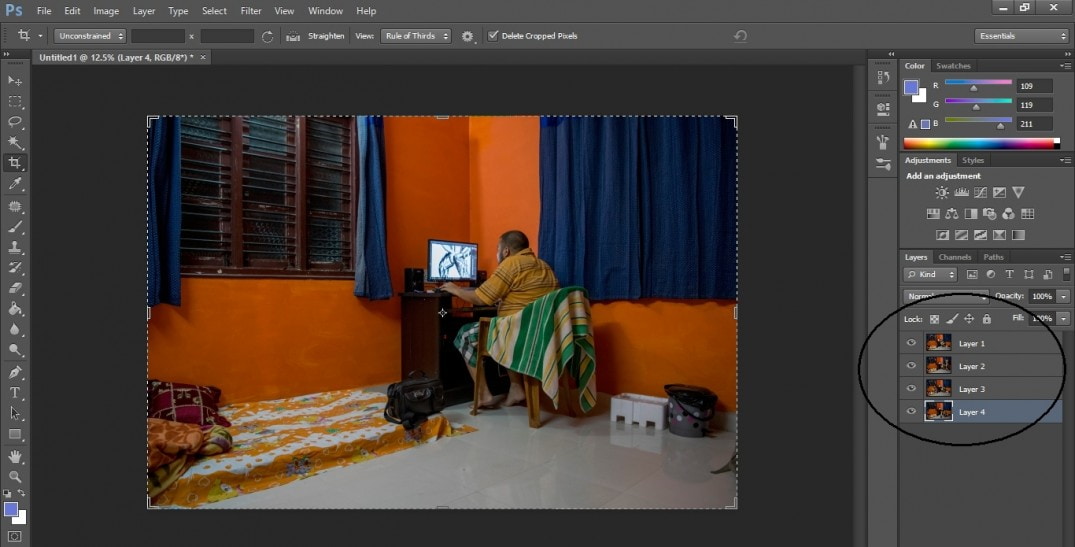
For today’s example we will try to create an everyday living room scene. So first, I will take different images of the subject, keeping him seated at various positions doing various things.

With these 4 different images, we will try to create this cloned image with all the doppelgangers of the same subject all present in the same scene.

Layer masking
You know how a mask works, right? It has holes in it through which it allows the wearer to see and breathe. These holes also let you see the eyes, nostrils and in some cases, the mouth of the wearer. Layer masking in Photoshop is something similar.
When you stack one image over the other in Photoshop, you will be able to poke through the image on top to reveal the one beneath it. Some of you might be thinking “why don’t I just use the eraser?” An eraser doesn’t give you the ability to reverse your changes. Of course you have the ctr+z and ctrl+alt+z keys to undo changes but it can be risky. Because you are completely removing data by erasing and it will most definitely hamper your creative process.
Learn Photoshop
Best online photoshop course to earn a diploma in photoshop. Register for top photoshop classes & master photo editing, graphic design, masking, automation.

Cloning photography workflow
Step1: Import all images
Open Photoshop bridge. Navigate to the location where you have stored your images and select all the images that you want to import to Photoshop layers. Now from the top menu, go to tools -> Photoshop -> load files into Photoshop layers.

You will see that Photoshop opens up and all the images get stacked in the layers panel on the right.

For the sake of reference, I am going to rename them as layer 1, 2, 3 and layer 4. To rename a layer, double click on the layer name in the layers panel and type in your desired name.
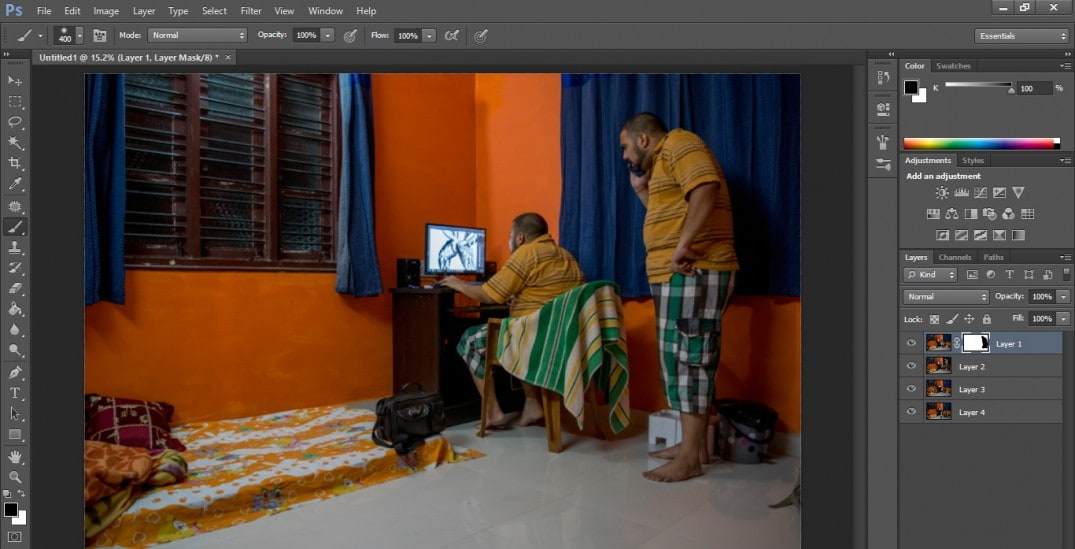
Step 2: Create layer mask
I am going to mask layer 1 over layer 2 to reveal the position of the subject in layer 2. To do that, I will select layer 1 and then click on this tiny icon in the bottom of the layers panel.

You will see that this will create a mask on layer one. It is indicated by the white box next to layer 1.

Step 3: Revealing clones
Now, we will select a hard round brush from the brush tool menu and set the opacity to 100%.

In the layers panel reduce the opacity to say 50% so you can see exactly where exactly you have the subject in layer 2.

Now with the hard brush, paint over the position of the subject in layer 2 to reveal it through the mask. Make sure you are painting on the layer and not on the image.

While painting, you will notice that the colour palette in fore ground and background is selected only as black and white. When you paint on the layer mask with black it will reveal the layer below. When you paint with white, it will hide. Use the ‘x’ alphabet key on the key board to quickly switch between the two colours and it will be easy to paint and erase on the layer mask. This is exactly why layer masking beats erasing.
Once you are done, change the opacity of layer 1 back to 100% and you will have something like this.
So now, you have the two positions of the same subject in one frame. Press down the ctrl key (cmd key in mac) and select both layer 1 and layer 2. Do so by clicking on the layer name. Right click on the selected layers and select merge layers.

Now you will see that you are left only with layer 1, 3 and layer 4.

Repeat what we did with layer 1 and 2 to layer 1 and 3. You’ll end up with something like this.

Again do the same for layer 1 and layer 4. Now working with layer 1 and 4 is going to be a little tricky because you will see that the position of the subject in layer 4 is overlapping with that of layer 1 and layer 2. So, if you are not careful while painting on the mask, you will end up erasing away the subject from layer 1 and 2.

To avoid this, we will zoom in to the image. Press ctrl (cmd for mac) key and the + key on the numpad simultaneously to zoom in. Carefully paint around the contours of the subject in layer 4 to reveal the subject alone and not erase away any other positions.
When you are finally done with layer 1 and 4, you will have your cloned image where you can see the all the doppelgangers of your subject creating a scene all by themselves.

Final editing
It’s completely up to the photographer’s discretion as to how they would like to enhance image further on from here. Use various filters, grey scale converters or any other technique that you like to create the desired feel in your image. Knock yourself out!
For this one, I’ll finish it by cropping it a bit to get my photography composition right, enhancing the structure in Nik Viveza and adding a vignette.
Images by Irfan Hussain
Looking to enhance your photoshop skills? Join our top-rated professional online photoshop course today!


